
On the previous iteration of my website I had several photo series where I documented the making of a piece from start to finish. These always seemed popular and served one of the main reasons I started this website to begin with, to help people understand just what all goes into making one of my pieces. So rather than trying to resurrect and rebuild one of those older photo series I decided to make a whole new one focused around the creation of this piece, Luminous Relic #1752.


Generally I cut a bunch of disks out of a large sheet of copper all at one time, but for this series I grabbed a smaller piece so I could show you the general process. This piece is to be made from a 6 inch diameter disk of 18 gauge copper. So I first set my dividers at 3 inches.
Then I determine where the center point of the disk needs to be in order to best utilize my sheet of metal with the least amount of waste. Using a center punch and hammer I punch a center kernel into the copper. I will use this kernel throughout the raising process as a fixed anchor point for one end of the dividers when scribing guide lines. Right now I’m using it to for scribing the outer circumference line I will cut on.


Using a tool known as a throatless shear I then cut out the disk. This thing is really just like a big pair of scissors. It’s called “throatless” because there is a weird little bend in the back plate that you can’t really see well in the photo. This bend allows me spin the entire sheet of metal all the way around when cutting without hitting an obstruction. Thus this is a great tool for cutting circles.
The shear does leave a bit of a bur on the edge which can be sharp. For safety I always take a moment to file this off.


The next step is to anneal the metal. This a fancy term for heating up the metal to make it soft and malleable. As I hammer on this it will rapidly begin getting harder and increasingly brittle. Eventually it could reach the point of breaking. However, I don’t intend to ever let it get to that point. Instead I will be frequently annealing the copper as I go along, bringing it back to a soft malleable state where I can keep pushing it around as though it were very stiff clay. I’m showing this initial annealing here in the photo series just to talk about this aspect, but I won’t show an image of it every time. That would get old real quick!
Different metals may be annealed in different ways. With copper I heat it until it’s glowing a dull red in a slightly darkened environment. Then I tend to let it cool to the point where I don’t see it glowing anymore, which happens quite fast with this gauge of sheet metal. At this point it will look black from all the oxidation built up from the torch. Since this is copper I will then quench it in a vat of water, hearing a sharp sizzle as it rapidly cools off. With some metals this sort of rapid quenching would cause it harden again.


After I’ve quenched the disk in water to cool it I will put it into what we call the pickle. This will clean off the dark oxidized layer, getting back to a pink color. You could skip this step, but I wouldn’t recommend it. What happens otherwise is that as the dirty metal is hammered all that black stuff gets beaten into fine particles that float up into the air and into your nose, mouth, eyes, etc. Due to foolishness in my youth, I am now quite allergic to this sort of dust. Hence after each annealing I will pickle the piece. Again I am not going to show this step every time as that would become very dull. Just know it happens a lot.
The pickle is a mild acid solution. There are various things people use for this. I use sodium bisulfate. This is most commonly found as a swimming pool chemical to lower the PH value of one’s pool, ie. make it more acidic.
The next step for me is to scribe a series of guide lines which I’ll use to help me keep the piece symmetrical as I hammer. Basically I’m going to be hammering in rings starting from the center and moving out. These lines help keep me from drifting too far out as I go. There is no exact measurement to them. They are just a rough visual guide.


Before I really begin the raising process I do a quick and rough course of sinking. With sinking I am hammering down into a depression in my tree stump on what will be the inside of the finished vessel.
An entire vessel could be made just with the sinking process, but I don’t do this for reasons I’m not going to get into here. I start with it just to get the sides of the vessel moving in the right direction. If I don’t do this bit of sinking and jump right into the raising something happens that I call “blowback” where as I begin hammering from the center of the disk the outer edges begin bending back toward me, moving the exact opposite direction I will need them to go.
What you see in this photo is all the sinking I do. Just this little bit seems to do the trick for preventing serious blowback. In fact, I’ve hammered the metal so little I don’t even need to anneal before moving onto the first course of raising.
I’m not going to get into all the details of raising in this photo series. That’s a full 3 day workshop to cover! Generally speaking with angle raising I am holding the metal at a more or less consistent angle on the metal stake, like the one you see here in the vise. Then starting in the center of the disk, and hammering on what will be the outside of the finished vessel I work around it in concentric rings. My goal is to hammer not on the exact point of contact with the stake. If I did that then I’d be squeezing the copper between two pieces of steel with every blow, thinning it out. Rather my goal is to strike just above the point of contact where the angle I’m holding the piece at should be creating a small air gap. As the hammer hits here the metal can then bend down into that air gap until it reaches the stake. Done properly, I can be compressing the metal, actually making it thicker as I go. In practice it’s generally a bit of both, compression and thinning, such that the thickness usually stays about the same.


I’m not going to have much to say for the next several photos. The process is simply repetitive. I will hammer around the piece. It will get work hardened, get annealed, pickled, and hammered again. I like to show images of the courses as they go though because I think visually seeing the different stages makes it way easier to conceptualize the process. When I tell someone I took that flat sheet and simply through hammering made it into a vessel form, no cutting or seaming involved, it can boggle the mind. That can be too much of a visual leap to make. When you see just one course to the next it’s not hard to imagine how it happened.
So here is the piece after the first course of raising.

This is after the second course of raising.

This is after the third course of raising.

This is after the fourth course of raising.

This is after the fifth course of raising. Note, this one is all dirty because I had annealed it and quenched in the water bucket before I realized I forgot to shoot the photo immediately after the hammer work from the fifth course. So I quick grabbed a shot before cleaning and hammering the next course.

This is after the sixth course of raising.

This is after the seventh course of raising.

This is after the eighth course of raising.
I should probably note that as I progress with the courses of hammering I am not always starting again at the center of the disk. I do scribe new guidelines each time. As the form develops I tend to be focusing more and more to the outer edge, generally not hammering any more in the center section at all. It is this process of deciding where to start each course that helps determine the final shape.

This is after the ninth course of raising. In this case this was the final course. Generally speaking I find I do between 8 to 14 courses of raising to develop most of my vessels to their basic shape.
In this photo too you can see fairly well how I was only hammering the outer edge portion. I just needed to get that section to come in a bit more for me to be happy with the form.
At this point I consider the basic shape established, but not yet refined.
To refine the form to what I really want, working out all the minor bumps and lumps, I do what is known as planishing. For this I switch to a different hammer with more of a flat round face. I also tend to reposition my stakes to get the angles I want to work at.
With planishing the goal is to hit the piece right on the point of contact. As I noted before if this is done too hard I could be stretching the metal. I don’t really want to do this so I am using a lighter weight hammer, and one that is shaped to disperse the force out over a larger surface area. The goal is more to pack down the metal and iron out the bumps.
Of all the courses thus far, this is certainly the most time consuming. Mind you, the decorative chasing work we will be getting to later is WAY more labor intensive than all the raising and planishing courses combined!
Anyway, with this course I need to be carefully watching the form as I go, making all the curves and profiles arc beautifully. It’s a slow, fussy process.


Here is the vessel after I’ve finished the planishing course. The irregularities that remained from the raising courses have been smoothed out providing me with a nice canvas to begin the decorative chasing work on.
In the process of raising the edge tends to get a bit irregular and wiggly as you see here. I’m going to want this flat when I go to solder on a silver rim later. I’ve found it easiest to go ahead and do the major grinding of the rim at this stage while it is work hardened from planishing and before I’ve begun the chasing work. The chasing will alter it a bit, so I’ll have to grind it again after that, but when it’s just a little bit it goes easy. I’m going to do the hard stuff now so if I slip I’m not messing up a lot of fine detailed work!


To get rid of the irregular edge I’ve found the easiest way is just to take it to a wide belt sander and grind it down flat. While fairly easy, I do find this to be the scariest part of the whole process.
The belt sander does leave quite a bur on the edge. I remove this with a half round file.


As I noted before I do anneal the piece in between each course of hammering. The decorative chasing stage that is coming up is yet more hammering so once again I need to make sure the metal is at its softest state before I begin this.
Traditionally a vessel is filled with some type of pitch for chasing work. While there are many types of pitch out there all I’ve worked with seem like they would be a horrible task to fill and empty from a vessel form. I don’t think I’d be doing the work I do if I had to use pitch for this.
Instead, back in college I stumbled upon the idea of using a microcrystalline sculptors wax instead. It is commonly used for bronze casting to make the models that get burned out. In fact, I am literally using salvage from the burn out kiln I gathered back in my college days!
The purpose is to have something inside that offers a balance of support and give. Support so the piece doesn’t collapse in on itself when hammering with chasing tools on the exterior. Give so those tools can actually move the metal back in a bit to create depth and dimension with some control.


I’ve found the easiest way to fill a vessel with wax is to first cram in as many chunks as I can. Then prop it upright, trying to make sure the rim is level. Next I use a torch to gently melt the wax down, adding more pieces as needed until it is filled right up to the rim, and hopefully not going over. (Going over creates something of a mess!) Once it is filled I will just let it sit and cool.
I thought I’d add an extra photo of the filled vessel once the wax has cooled. Generally as it cools it contracts and sinks down in the center. This is perfectly fine to work with. My only concern would be if it pulled away from the edges as it cools. The wax I prefer almost always sinks in the middle rather than pulling away from the edge. For those wondering, specifically what I’m using is #2AB56 made by J.F. McCaughin. (I need to get my page specifically about the wax made yet and linked to this.)


People sometimes ask me if I draw my designs out on paper first. I don’t, because that just doesn’t work well for the sorts of forms I like to use. A flat drawing just doesn’t conform well to a more spherical surface. So I’ve always gone in and worked out my initial drawn design straight on the vessel itself. Sometimes my designs can be all worked out at once. Lately though I seem to be getting more complex, where I design in stages. This piece is one of those complex ones.
So what you see here is the initial layer of design. This part is relatively simple, a series of circles overlapping each other to cover the surface. I still spend some time carefully considering where everything is in relation to each other. Ideally every layer of design would be a fully resolved composition on its own. At least that is my goal. For this piece I’m using a carbide tipped etching needle to establish center points, and then a compass to draw the lines in pencil. I always design in pencil first so I can easily make changes as needed to get the composition right.
It may be hard to see in this photo, but I have gone back over my initial pencil lines with a sharp metal point to lightly scribe the lines in. Fortunately I have a nice set of compasses my father got me decades ago which includes some with two metal tips for just such purposes. Thanks Dad!
The reason I do this is that the pencil lines would get rubbed away before I could get them all chased in. By lightly scribing them in I have a line that won’t be rubbed away. Sometimes it is hard to see, however I can always look carefully to see it and go back over it with pencil to make it more visible in a section. Then after chasing that section I can move on and draw over the scribed lines on the next section, and so on.


Finally I’ve started the chasing work. I generally always start by establishing my lines. When I design I find I generally envision a line as being an intersection of two planes. One side should appear higher and the other side lower. It doesn’t have to be this way, but that’s how I tend to think when designing most pieces, including this one.
So early on I designed a chasing tool for myself to do just this. Actually I designed a couple tools. In this case I’m using my special flat liner instead of my curved liner because I want the outside of the circles to be sunk down and this tool fits best.
If you are interested in knowing a bit more about some of the chasing tools I use you can check out this blog entry where I discuss the basic 15 piece chasing tool set I make for my workshops, and anyone else when they are available. Mind you, my personal set of chasing tools is much larger than just 15!
Here you can see the piece after I’ve finished the initial lining work. The lines are well establish, but the forms they make don’t have much 3 dimensional depth to them yet. They more or less all exist on the same visual plane.


My next step after the lining work is what I call “pushing the planes”. This is where I begin sculpting the piece, making certain planes appear to come forward and others to recede. In this photo I’ve started this work on the right hand side.
Here you can see the piece after I’ve finished pushing all the planes back that needed to appear to recede. Most of this work is done with the flatter tools you see directly to the left of the nest holding the vessel. I’m also using a bunch of other small triangle tools to get into and crisp up the corners.
I’m happy with how the piece is going but I want these forms to go deeper. To do this I need to repeat this course of chasing, pushing everything a bit further. However, the metal has become work hardened at this point.
Chasing is a technique that stretches the metal, making it thinner in areas. I run a serious risk of breaking through if I don’t keep the metal soft when striving for deep chasing.


The catch is that I can’t anneal the vessel to soften it again while the wax is inside. I need to first empty it out.
This is the part that could be dangerous! Because I have an inward turning lip the block of wax is prevented from easily sliding out. It stays trapped in by the lip. If I just heated it up all over what would happen is molten wax would form up in some area where it is trapped, unable to flow out. As it heats up it expands. If it’s trapped then pressure just keeps building until at some point it will find a release. Generally that release will be sudden, violent, and unpredictable as to exactly where it happens. Put another way, you’d be making a small bomb, urging it on to explosion while standing next to it with a torch. Not a good idea, believe me! I’ve done it a few times until I finally got smart. Thankfully I never got hurt. I just shot out 20 foot flaming jets of molten wax!
I’ve since developed this much smarter, safer way to melt the wax out nice and easy. In short I get it propped upside down over a collection tray and gently heat with a torch only from below.
Here is an action shot of me gently heating the wax from below. Notice that I am not really aiming the torch at the vessel itself. I’m just focused on the wax. This way as it melts the molten wax can simply drip down into the collection tray.


Here’s another action shot of the melting process. Generally a point is reached where a larger plug of solid wax shifts and begins to drop down. This is towards the end stage of melting it all out. Occasionally there is a tiny bit of pressurized wax behind it that suddenly chugs out when it shifts, but I’ve never seen anything dangerous happening when I’m doing the melting this way, slowly from below.
The biggest problem I tend to have when melting out the wax now is that plug dropping down into a molten puddle of wax causing a splash. You can see in this photo how the walls of the exhaust cabinet look like a bad B rated chainsaw massacre movie. This is from splashes of hot, red wax.
The trick I’ve come to use that minimizes this is the loose woven wire net at the bottom of the tripod stand. That generally catches the plug, or at least breaks the momentum and slows the fall.


While the wax is way cleaner and easier to use in a vessel than traditional pitch would be, it does still leave a residue film that needs to be cleaned off. I could use paint thinner to dissolve and wipe it away, but since I’m just going to anneal the piece next I simply burn it. Thus I clean out the residue and anneal in one step.
Once the annealed piece has been pickled I again fill it with wax as before. The nice thing about the plug that drops down when emptying the wax from the first course of chasing is that it usually can be shoved right back in, helping to fill the piece up just a wee bit faster. Again I also have my chunks sitting ready nearby to add in as I melt the bits down inside the vessel.


Here you can see the vessel once again filled up to the rim with wax ready to sit and cool down. Once cooled it will be ready for the second round of chasing.
This second course of chasing is essentially a repeat of the first. My goal is just to get everything a bit deeper and more defined.
So I begin again chasing all the lines. It does go easier the second time, because I have the prior line to run the tool in, sort of like riding it along a rail.
I don’t think I mentioned this previously, but this technique is generally referred to as chase and repousse work. Chasing is working from the front of the piece while repousse is working on the back side. With a vessel the backside would be the inside. While there are tools called snarling irons that can be used to hammer out from within I don’t use them. I do all my work from the front, hence I simply refer to it as chasing.


After doing the lining work I followed it up with another round pushing the planes back and tucking in the corners. The goal is to sculpt it to look like a bunch of overlapping disks. With the design style I am doing on this piece these disks will then become the mini canvases for the next layer of intricate design work.
At this point I have finished the second round of chasing. For the third round I do not plan to develop any serious depth. As such I’ve found I don’t need to melt the wax out and anneal again before the next course. In fact, it is often easier to do the more shallow detail work on a more work hardened surface. The extra hardness prevents me from pushing it too deep. So this piece is now ready for the next course of chasing just as it is.
For this particular design I need to take some care in terms of which medallions to chase first. This is because I am designing them more or less symmetrically around their center points. However, due to the overlapping of the circles some of the center points for the most recessed medallions are actually on a circle next to it and up another level. If I made the mistake and chased that higher level section first it would obliterate the rather delicate center dot I made with the etching needle earlier. Then I would have the fun of trying to figure out where the center point is again. I figure it’s easiest to just take care and avoid this problem doing them in the correct order when needed.


Here is a shot showing the bulk of another days progress with the detailed chasing work. Again I was focusing on doing the recessed medallions whose center points were located on a different circle. I believe I have now finished doing all these sort of sections.
In some ways these partially showing disks are the most difficult to do. It’s challenging to create the designs intended to appear symmetrical when I can’t effectively layout the whole thing. I need to do it convincingly enough that the viewers imagination automatically fills in what they can’t see, creating the illusion that the whole medallion exists underneath the overlapping ones.
In this photo you can see one of the medallion sections after I’ve drawn out the new layer of design on it and scribed it in to preserve the lines once the pencil rubs away. I don’t always design a whole section out before I start to chase in the details. Sometimes I just start at the edge rings, designing and chasing my way in bit by bit.


For this medallion I thought I’d run through in a bit more detail what tools I use and how I tend to develop these.
So after the initial design is worked out I need to use a liner tool of some sort to chase in the lines. For this piece at this stage I am almost always using what I call the “fat liner” in my 15 piece set. I hold this at a bit of an angle so just one of the sides is digging in as I hammer. That side then establishes my line while also pushing out the plane a bit on what will be the lower section.
My fat liner only gets in so close to the corners. To really crisp and sharpen up the forms I need to tuck these corner sections down. To do this I have made a variety of triangle tools with slightly different angles for this. I will select the tool with the angle that fits best without being too wide, set it in the very corner, and hammer it down.
You can’t tell too well in this photo but on these tools just one corner of the triangle is high with all the rest being sloped back. This means as I hammer on it all my force is initially directed to just that very tiny corner section, dropping the metal there very quickly. As the tool sinks deeper the metal of the vessel comes into contact with more and more of the sloping surface of the tool, thus dispersing the force more to ever greater amounts. The more the force is dispersed the less the tool sinks in. The goal being that it will stop dropping the corner deeper before I reach the point of breaking through the copper. I still need to be careful though.


The next step is to push the planes back just like I was doing with the initial circle shapes over the whole vessel. In this case though I am not seeking any great amounts of depth, rather just a bit of visual separation, a small drop in visual levels.
Most of the work is done with the 3 tools you see here, my large and small square flatters and the fat liner. I also find I use the triangle and oval/circle flatters I have to get into those tight corners and little spaces. If you want to see these tools better they do happen to all be in my 15 piece chasing tool set I blogged about previously.
For this design style I go crazy with textures, often times creating just subtly different textures from one area to the next. I have a lot of different tools I’ve made over the years for this sort of work. I find every tool, even when I try to make them the same, seems to make a slightly different texture. To get this medallion to this stage I used these 7 tools for texturing.


I’ve been deliberately setting this section up to utilize a particular designed texture. It breaks away from strict symmetry, but I feel like it looks great to have an area or two like this. It’s an even more labor intensive look than all the rest and I find I must first layout a new framework for this design in pencil. It’s basically a “honeycomb” pattern. Once I have it in pencil I must lightly scribe it in as always.
After the honeycomb pattern is drawn in I grab my very fine “fur” tools that essentially just cut in a narrow line and begin hammering in a series of radiating lines around a central point in each cell of the honeycomb. Part of what makes this texture so time consuming is that I am constantly spinning the whole vessel around and around, and around to get the right tool angles as I do each little cell. One could get dizzy spinning around in all those circles! I love the look though so I put up with the tedious labor.
Oh, you may notice the previously blank overlapping medallion section “magically” got done in this photo. It wasn’t magic, just more labor. All my initial shots of this stage of work turned out blurry so I went back later after I had done this next medallion to take another photo.


At last I am down to the last medallion. For some reason I tend to leave the larger, top level ones to do toward the end with this design style. Partially this is because they are the top level and as I noted before the lower layers may need to be done first due to the locations of their center points on other disks. However, it’s also because I want these larger prominent sections to be among the best designed, and toward the end of a piece I will have the most practice at it and thus should be doing the best work. This doesn’t mean it always works out this way, but that’s my hope. Naturally, I aim to make all of them meet a fairly high standard of good. I guess you, the viewer, gets to decide how successful I am at this.
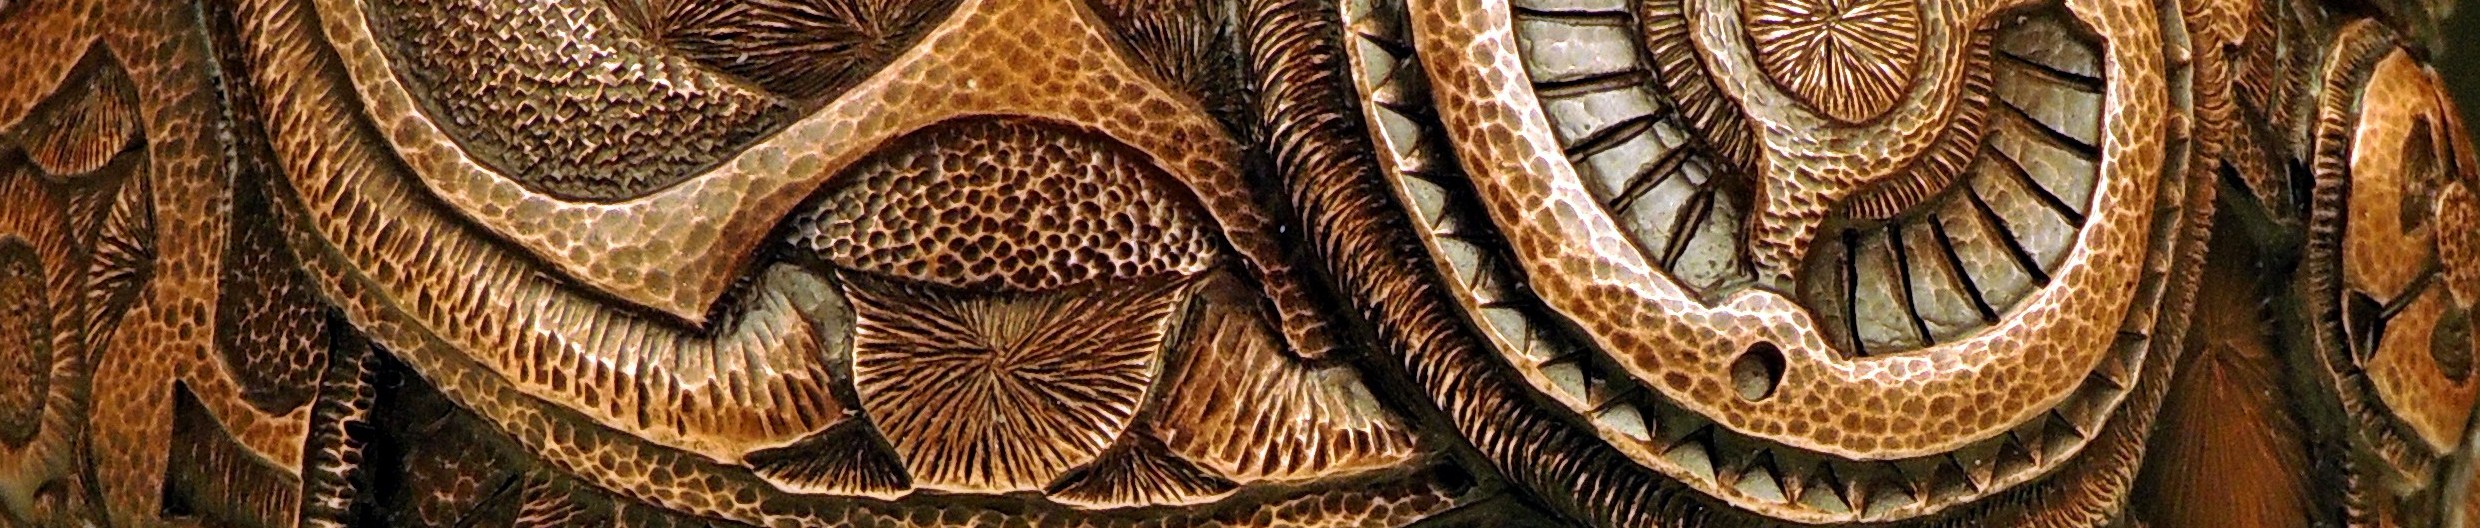
Here is a shot after I’ve finished the chasing work on this final medallion shape. For some reason with this design style I always think I’m done with all the chasing at this point. Every time it seems I forget there are a few tiny areas between some of the disks that need a background texture. This time I remembered shortly after taking this photo and went back to do those spots. (You can’t see any of these spots in this photo though.)


With the chasing work all done it is time to melt the supporting wax out from inside. I did it just as before, propping it upside down and heating slowly from beneath.
As you can see in this photo the rim edge got to be quite irregular as a result of the chasing work. At first glance this would look like a horrible problem. However, having done a piece or two in the past I know this is easy to fix up.


Using a rawhide, non-marring mallet I take the vessel back to a forming stake and carefully hammer around just the edge. All the severe irregularities go away quite quickly. Sometimes it takes a bit of careful tweaking to get fully back into round though.
You might think the chasing work risks getting beaten away in this process, but my experience has been that as long as I’m carefully working just the top half inch or so of the vessel there is no issue with losing the sense of depth and layering.

Again as before I will take this to my belt sander to grind the rim down fully flat. It’s always a bit scarier after days and days of chasing work. The fear is that I’ll lose my grip and the piece will go flying! It happens from time to time. This is why I did the major grinding earlier. At this stage I don’t need to do much to get the rim flat again, so there is less time on the sander, and thus less risk.
Again, like before the belt sander leaves a bur around the edge that I go back and file off. Since I didn’t need to do as much sanding this time there also wasn’t as big a bur to remove.


Something that I feel is critical in bringing all artwork up to the next level is paying attention to and finishing off the edge, whatever that may be. In this case it is that copper rim of the vessel. It’s small in surface area, but important to the overall look of the piece. Conceptually it is where the inside meets the outside, and also sort of where the space the vessel occupies opens up and meets with the wider world. It needs to be acknowledged and finished off in some way.
I’ve found a nice solution to this visual problem is a polished silver wire rim. Making this to fit the vessel is my next step. I start by selecting the gauge of wire that looks best for the piece, bend it around a mandrel to get it fairly round, and then what you see in this photo is me determining where I need to cut it off the spool to get the right size.
Once I have the rim cut to the right size I need to solder the two ends together, forming the circle. I use an acetylene/air torch for this as it is the torch I own that I have the most flame control with. Soldering requires much more flame control than annealing or melting wax.
I use what is known as hard silver solder to do this first joint. It is an alloy of silver that melts at a higher temperature than the “medium” solder I will use next to solder the rim on the vessel itself. The hard solder alloy also has the most silver in it so it has a better color match than the lower melting temperature silver solders.


Once the ends of the rim are soldered together I need to make sure it is trued up round and hammered out flat. To do this I will first use my rawhide mallet on the bracelet mandrel to get it true round. Then I will carefully hammer it down flat on the bench plate.
I don’t necessarily need to do this next step, but I do. Soldering goes easiest when there are no gaps at all between the pieces being soldered together. When I go to solder this on the vessel it will be a rather long line to flow solder around. So the better the fit the easier it will be for me. Hence I will usually take the silver rim and sand a bit of a flat spot on one side by running it over a sheet of abrasive paper taped down to a flat board.


An important thing to know about solder is that it needs clean metal to flow properly. Dirty metal will stop it. So part of my final preparations before soldering on the rim is to pickle both the vessel and the rim.
In this photo you can see this batch I’m finishing up sitting in my pickle ready to go. As a side note I do tend to work in batches. It just seems more efficient to do things like rim soldering all at once on a group.
There can be a lot of little preparation steps prior to soldering. This is another I need to do when the vessels have detailed chasing up by the rim edge as this piece does. Solder seems to especially like to flow down narrow lines, such as I have in much of the chased texture on this piece. As I noted before solder also doesn’t like to flow on dirty metal. So to prevent it from flowing into all the texture details I must do something to make that area “dirty”. In the past I’ve used yellow ochre, white out, and Stop-off. These days I’ve found I like Ronda Coryell’s Masking Mud. It’s a non-toxic product that seems to work well for this task. I carefully paint it up around the edge where the risk of solder flowing where I don’t want it is the greatest.


It’s finally time to solder that rim on. To help keep the joint area clean while I heat it I also need to paint a flux on it. Then I set the silver rim carefully in place and put the whole thing in my annealing pan that can smoothly spin around like a lazy susan. I will be using wire solder to do this. What this means is that my solder, medium grade at this point, is in a wire form. I will carefully feed it in when the metal is hot enough for it to melt and flow. Then with the torch I can draw that line of flowing solder around, adding more in as needed. One neat aspect of solder is that it flows to the hottest point. That is how I can control its movement with the torch, to some extent anyway.
I find using wire solder much easier and cleaner for this sort of operation than using small carefully placed chips of solder, or some other method. However, it does take some practice to get good at it. You need to develop a reasonable degree of control with both hands, the one holding the solder and the one holding the torch.
This next images shows the vessel after I’ve gotten the rim soldered on. You can see the areas where the flux was that are still copper colored, as well as where the masking mud is. The rest of the piece that was bare, clean copper got oxidized to a deep black. When soldering the rim on I am able to gauge when the metal is hot enough by watching the colors and levels of oxidation forming.


Now that the rim is soldered on I move into the final clean up stage. Initially using files I will clean up any extra solder lumps or flows from around the rim. In this case the masking mud did a good job of preventing anything from flowing down onto the vessel itself. I find I often have to use a fine wire brush to get all the masking mud out of the texture grooves. I’ll also use some radial bristle brushes on my flex-shaft tool to start smoothing out the surface of the silver rim. Lastly, as a surface preparation for the patina I will use a Scotch-brite pad or fine sanding sponge to go over the whole surface of the vessel. Having this slightly scratched up surface helps the patinas to bind.
I’m going to pickle the piece good one last time in preparation for the patina. Patinas are chemical reactions happening with the metal to produce oxides on the surface. In order to get an even, controlled patina I want to make sure it starts clean and free of other oxides. This is what the pickle does for me.


For this piece, as I use for most of my chased pieces, I will go with a liver of sulfur patina. It’s a fairly simple patina which often has me feeling like I’m cheating to use it so much. However, as a college professor once tried pounding into my thick skull, just because you put a lot of time and effort into a piece doesn’t mean it is good. Likewise, just because something is quick and easy doesn’t mean it is bad. The liver of sulfur patina is simply an excellent finish for heavily textured copper work. It’s a thin patina that doesn’t fill in and obscure fine details. Rather it can be layered to accentuate those details.
I usually do this finish in my bathroom since I use lots of hot water in the process, and my studio doesn’t have running water in it.
In this photo you can see the patina mixed up in the bowl to the left of the sink. This needs to be mixed up fresh each time as it doesn’t stay good too long. You also know it’s good when it stinks! (That’s the sulfur part of liver of sulfur.)
Typically I do a liver of sulfur patina in multiple layers, and this piece is no different. Initially I am just looking to darken the whole thing, which conveniently is easiest to do when the solution is the freshest. So in this photo you can see Luminous Relic #1752 and the others I’m doing in this batch after their first coat, while everything is strong and fast acting.


After the initial darkening I will use sanding sponges to sand the patina off the high spots creating highlights, and then dip it again. On this piece I did this a couple times. Mostly what I am trying to do is get the most recessed areas to a darker color and then have just a light, even patina over the high spots. With a heavily textured piece this accentuates the texture, making everything visually pop out even more.
Here’s more of a close up shot of the vessel after I’ve finished the patina, but before I’ve applied the wax sealing layer.


I seal my patinas with a wax finish to add a bit of shine and help keep them stable over a longer period of time. (Over a long enough period of time all patinas will change some depending on the environments they are in.)
I will do what I call a hot wax or cold wax finish, depending on the patina. With a cold wax finish I am applying the wax at room temperature. For the liver of sulfur patina I like to use a hot wax finish. To do this I will heat the piece up some so that when I apply the wax it quickly melts and even smokes a bit, helping to penetrate into all the little grooves and spaces. For the wax I’ve found good old Johnson’s Paste Wax to work wonderfully.
When I’m doing the patina it inevitably gets all over the silver rim. This is why I don’t bother trying to polish the rim before doing the patina work. To clean off the rim and then polish it up I need to mask it off so I don’t end up damaging the finish on the body of the vessel.
I use a variety of low tack masking tapes for this, depending on just how delicate the patina is. The liver of sulfur is a pretty durable finish, another reason why I like it. Thus I can use a lower cost, higher tack, drafting tape on this piece.

With the protective masking tape applied I can then go in with a radial bristle brush to quickly strip the patina off the silver rim.
Interesting side note, the flex shaft tool I’m using here is one of the few points where I use any electricity in the entire process of making my vessels. For the most part everything else I do is using simple hand tools. I enjoy how very complex looking objects can be made with such simple tools.


After the initial stripping of the patina I do the rest of the polishing by hand with abrasive papers, sponges, and fabrics, working it down to a 12000 grit fabric, which is the final finish. Then I carefully peel off the masking tape.
The final stage of the piece is the gold leafing. I need to do this last because the leafing is a fragile finish. If I tried doing it any earlier in the process it would have gotten obliterated by the time I was done.
To adhere the leaf I use a slow set oil based sizing. I paint on a thin even coat and let it dry until it reaches the proper working tack. Because it is a “slow set” type this takes 10 to 12 hours. The advantage to the slow set is that once it reaches the working stage it will stay there for another 10 to 12 hours, giving me plenty of time to work. (I still always feel the clock ticking in my head the moment I paint the sizing on though.) Generally I will paint this on just before I go to bed. By the time I’m up and ready to start working the next day the sizing is generally ready to go as well.
You may notice that I’m using Rolco brand sizing. I like this brand, but good luck finding any. From what I can tell they were wiped off the map by hurricane Sandy some years ago. When I realized this I went out and bought all the small sized cans of it I could find on the internet. Sadly I’m down to my last can.


I had such good intentions to grab a shot part way though leafing for this photo series. However, I seem to get in a groove when leafing and just plain forgot to grab that shot. Sorry.
Applying gold leaf isn’t that hard. It is however, a slow and meticulous process. I use the brush you see here to tear the squares into smaller pieces which I then feed into the vessel and smooth down in place. On chased pieces especially, it will crack and split all over the place! However, it will also fold over itself with the extra easily brushing away into small bits and dust that can fill those prior cracks and spaces. I just carefully keep applying it until I cover all the spots.
One thing I’ve learned over and over again with leafing though is that if I’m working to a deadline I need to leave 2 days for leafing. This is because no matter how careful I am it seems there is always at least one spot that doesn’t take. Either I missed it with the sizing to begin with, or the sizing was so thin there it dried too much, or sometimes the leaf itself was beaten too thin in a spot requiring an extra layer. I do often get vessels that leaf perfect the first time. However, I usually work in batches of vessels and I have yet to have a whole batch go perfect the first time. This vessel fits the norm in that there was a tiny spot I seem to have missed with the sizing. So I need to paint on a bit more sizing to cover that area and wait another 10 to 12 hours while it dries to the proper tack.


Now, another 10 or so hours later, I’ve applied a bit more leaf to cover up that missed spot. The piece is now essentially done. I still need to sign it, catalog it, and do the final photography.
Here are some images of the piece, Luminous Relic #1752, in its completed state.
This piece was made from copper, fine silver, and 23-karat gold leaf. The final dimensions ended up being approximately 3″ x 3″ x 3″.


I hope you’ve enjoyed this look at the process of making this vessel from start to finish. I enjoyed making it and putting this photo documentation together. Please feel free to share it with others!
Oh wow! This makes for great reading with my morning coffee. Not to mention what it means to see it as an answer to my unsaid prayer. THANK YOU David. Stay safe. C
Thanks Claude! Hopefully you will find it just as interesting as I finish out the documentation as the piece progresses. Stay safe as well.
Thanks for the detailed progress pics. I’ve always admired your work and patience. Also, beautiful planishing job. Looking forward to the finished piece.
Thanks Jim. I’ve always enjoyed your vessels too!
David this is Amazing, absolutely Amazing!! And thank you for taking the time to outline all the steps it takes for you to make a vessel. It makes me appreciate you and your work even more then I already do. Also love your new website.
Thanks Joe. So glad you especially like it!. Happy you like the website as well. It should only get better as I slowly add more material to it.
I just finished the chasing on this piece so let go update this page with a couple new photos. 🙂
When do you patina the work? Do you use liver of sulfer?
Good anticipation! Today in fact I was doing the patina work. As I type this I’m a bit behind in posting the latest images but will hopefully get caught up again tomorrow. The patina comes after the silver rim is soldered on, which is the next major process I have to post about. I use many different things for my patina in general. However, most of the chased pieces I do, including this piece, do get a liver of sulfur patina. It just works so well for highly textured surfaces.
What do you use to hold your piece as you are doing the chasing?
Thanks for the question Lee. The black thing you see the piece sitting in on the chasing photos is what I’m using. I’ve been calling this a “chasing nest” I have a local wood turner, Fred Bivens (who is way more skilled that what I’m asking him to do while making these), turn them for me. The one I’ve been using in these shots has been coated with a paint on Plasti-Dip to give it a slightly rubberized surface. Otherwise I use the nests in their natural wood finish but with a piece of the shelf liner/carpet backing stuff you can just see a bit of underneath the nest in the photos. Both of these give a bit of cushion and a bit of grip. The nests themselves are patterned after the rubber base my first pitch bowl came with. When I started teaching workshops I needed to find something I could get in quantity for the students to use and so the chasing nests came about.
There is still a bit of a skill to pick up in how to chase on a vessel form in the nest and not have it moving all about. The simplest description of this I can give here is to keep adjusting the vessel so the chasing tool is directed straight down. Thus the force of the tool helps to push the piece down in place.
Just amazing and so original. Thank you!
You are most welcome, and thank you.
Well, finally, I saw your post on fb; and my fingers just had to zoom & home-in…Wow ! What workmanship ! The attention to detail is mind-boggling. Just beautiful . Since you speak ‘in days’ , for the steps taken , but don’t mention how long it takes, on average for a piece , I understand about the ‘batch concept’ , I would find it interesting to know how long it takes , from start to wax-finish , for a given number of pieces in a batch .
I also love and appreciate that you put this up on your blog, AND that it will stay there , as kind of reference, for anybody to peruse (firstly myself, lol) , in the future. It must have been harrowing, to a certain extent , to record all the steps while working….Thanks a LOT !!!
C
Thanks as always Claude. The question of how long it takes me to do my work is a tough one to answer because I really don’t keep track of time. I’m blessed to not have to punch a time clock! All I have are guestimates. For this particular piece if I condensed all the time down I would guess at about 7ish days full-time work. As for how long a batch takes, that’s almost harder since each batch varies so much as to what is in it. More broadly I find I usually finish 80 to 100 pieces in a year, of course most of those are the much less labor intensive ones.
Thank you very much for this presentation, it was fascinating to read and very informative. Your work is incredible, I admire. Hello from France. My greetings, lorin
Thank you for your kind words Lorin. I’m glad you enjoyed it!
David,
So glad you are able to document the making of this new vessel. I am so grateful that Carrie commissioned you to make the vessel for me. I see it each morning as I wake up and it still glows.
Fred
Thanks Fred. I believe the photo documenting I did of your piece was the very first time I did this sort of thing. I was happy Carrie commissioned it as well, and so pleased to hear it still brings light into your life all these years later!
Thank you for sharing this step by step. I have been inspired by your work. Recently I have been learning how to raise vessels . You showed your stakes in the old web site but at that time I had not started to raise. The shapes of the stakes makes a whole lot more sense when you experience raising first hand. I have access to a blacksmith shop , what size rod did you use to make the stake you used for Relic 1752 ? I have collected over the years a number of stakes but see the virtue of the Japanese style stake that your stake mimics. When the “Crazy “ gets over I would love to take a class or two from you. I will watch out for any update for classes .
Thanks again for all the effort that you have put into this step by step. I know that it takes a lot of time . Robert Taylor
Hello Robert. Nice that you have started raising! It’s an intriguing process, one that really shows what malleable means. I did most of the raising for this piece on my stake made from stock 1.75″ in diameter. I might have used my next size down, 1.25″ diameter, for a little bit, but it was predominately the larger one. I hope you can make your own. It’s always nice to be able to do that.
Hopefully after all this COVID “fun” is over we will get to meet in a workshop.
Thank you very much
You are most welcome.
Thank you for sharing all this information. Wen you apply the green patina do you do it before the liver of sulfur or after?
On this piece I only used the liver of sulfur patina. There are some chased pieces where I will use both. In those cases I do the green patina first. It’s actually more of a light blue green color at that point. Then I scrub it off the high spots to help accentuate the textures from the chasing work. Then it’s a quick liver of sulfur to tone it all back some, which also turns the light blue of the patina to green.
Thant You!!
thanks a lot for your valuable documentation of work and notes!!
You are most welcome Rushi.
David, very exquisite work that you do with so much texture and depth. I wanted to ask if you use copper exclusively because of the types of patinas that you employ or could you create a vessal in silver as well. Once again your work is inspiring.
Best regards, Chris
Greetings Chris. Thanks so much for the kind words and question. I do love copper for how beautifully it works and the wide range of patinas I can get with it, however, I do vessels in silver from time to time. I’ve found fine silver is a dream to work with too as it moves so nicely under the hammer. I was just talking with someone about this a while back. It’s kinda funny I tend to not do many silver pieces because I expect they won’t sell as well due to the higher cost, yet I tend to never have any available because they always sell! How silly is that? I really do need to make another one soon. Perhaps once I finish the current batch in progress I’ll do at least one silver piece in the next group.
David, I know silver also takes a great patina using Liver of Sulfur as I have done many rings that way. Please let me know if you ever teach or have seminars because I would love to raise more vessels.
Best Regards Chris.
Thanks Chris. I too have used the liver of sulfur on silver. It’s a great patina, esp. for chased work as it can really help highlight textures.
While I don’t have any workshops scheduled at the moment I’m sure something will happen at some point in the future. I’ll certainly post them here on the site when they are ready for enrollment. Then I’ll get a note out to my subscribers so you all are aware of it. I’m pretty sure I saw that you had subscribed. I do hope we can meet in a class at some point!
David thank you very much for sharing your process it is amazing to see such craftsmanship and beauty. I’ve been intrigued on how you accomplish such detail in your vessels. I’ve started raising vessels and trying to chasing the surface has been alluding my talent level but reading your step by step process I think I’ll give it a try on the next one. Thank you again
Doug Shemenski
Thanks so much Doug. I hope you do give vessel chasing a try on your next one! It is a fun process with endless possibilities.
Hi David, Thank you for your incredible description of your methods, this is true craftmanship.
I’ve been making a few vessels myself (in silver), but this is certainly an inspiration to try out some new techniques. 🙂
Best regards
Allan
You are most welcome Allan. Thank you for the comment and kind words. Glad I could offer some inspiration. I just got a sheet of silver myself as it’s been a while since I’ve done one in silver!
David may l congratulate you on your meticulous step by step descriptions of your process.
They are an absolute gift to the metal working community!
I admire your design style and imagination, you obviously can envision the whole piece before you start.
Brilliant work!
Have you tried Baldwins Patina? It colours the copper but doesn’t affect the silver.
Not sure if the black is as rich as the LOS – long long time since l used it!
I would love to see some of your silver vessels.
Hello Rosalind,
Thank you for your kind words. Glad that photo documentation series was useful for you. I have used Baldwin’s Patina. I’ve a jar or two of it in my patina chemical arsenal. 🙂 In my experience it doesn’t get the copper as dark as liver of sulfur can, but it is wonderful for some applications. I most frequently use it on some of the collaborative mokume gane pieces I’ve done with David Barnhill.
It has been far too long since I’ve made a silver vessel. It’s about time I changed that!
My jewelry teacher, Lexi Erickson, has one of your beautiful vessels. Now, ten years later, I was inspired to try and find you online to show another artist friend. Thank you so much for this tour of your process…I would have never expected to find that, but there is so much artistry in your pieces that I aspire to own one someday. Your work is absolutely stunning.
Thanks so much Kat. Lexi is great! Thank you too for sharing my work with your friend. I’m glad you enjoyed this process series. I’ve got another process series almost ready to publish but I just can’t seem to get around to finishing the write up. Hopefully it will happen soon.
Your photo documentation of the process is very helpful—especially after participating in your workshop at Metalwerx last week. Now I have no excuse not to keep working on what you taught us!!!
Thanks Cynthia,
I’m pleased this photo series is of help to you, and that it makes all the more sense after the workshop last week. Thanks for all your help while I was out there too! Hammer on!